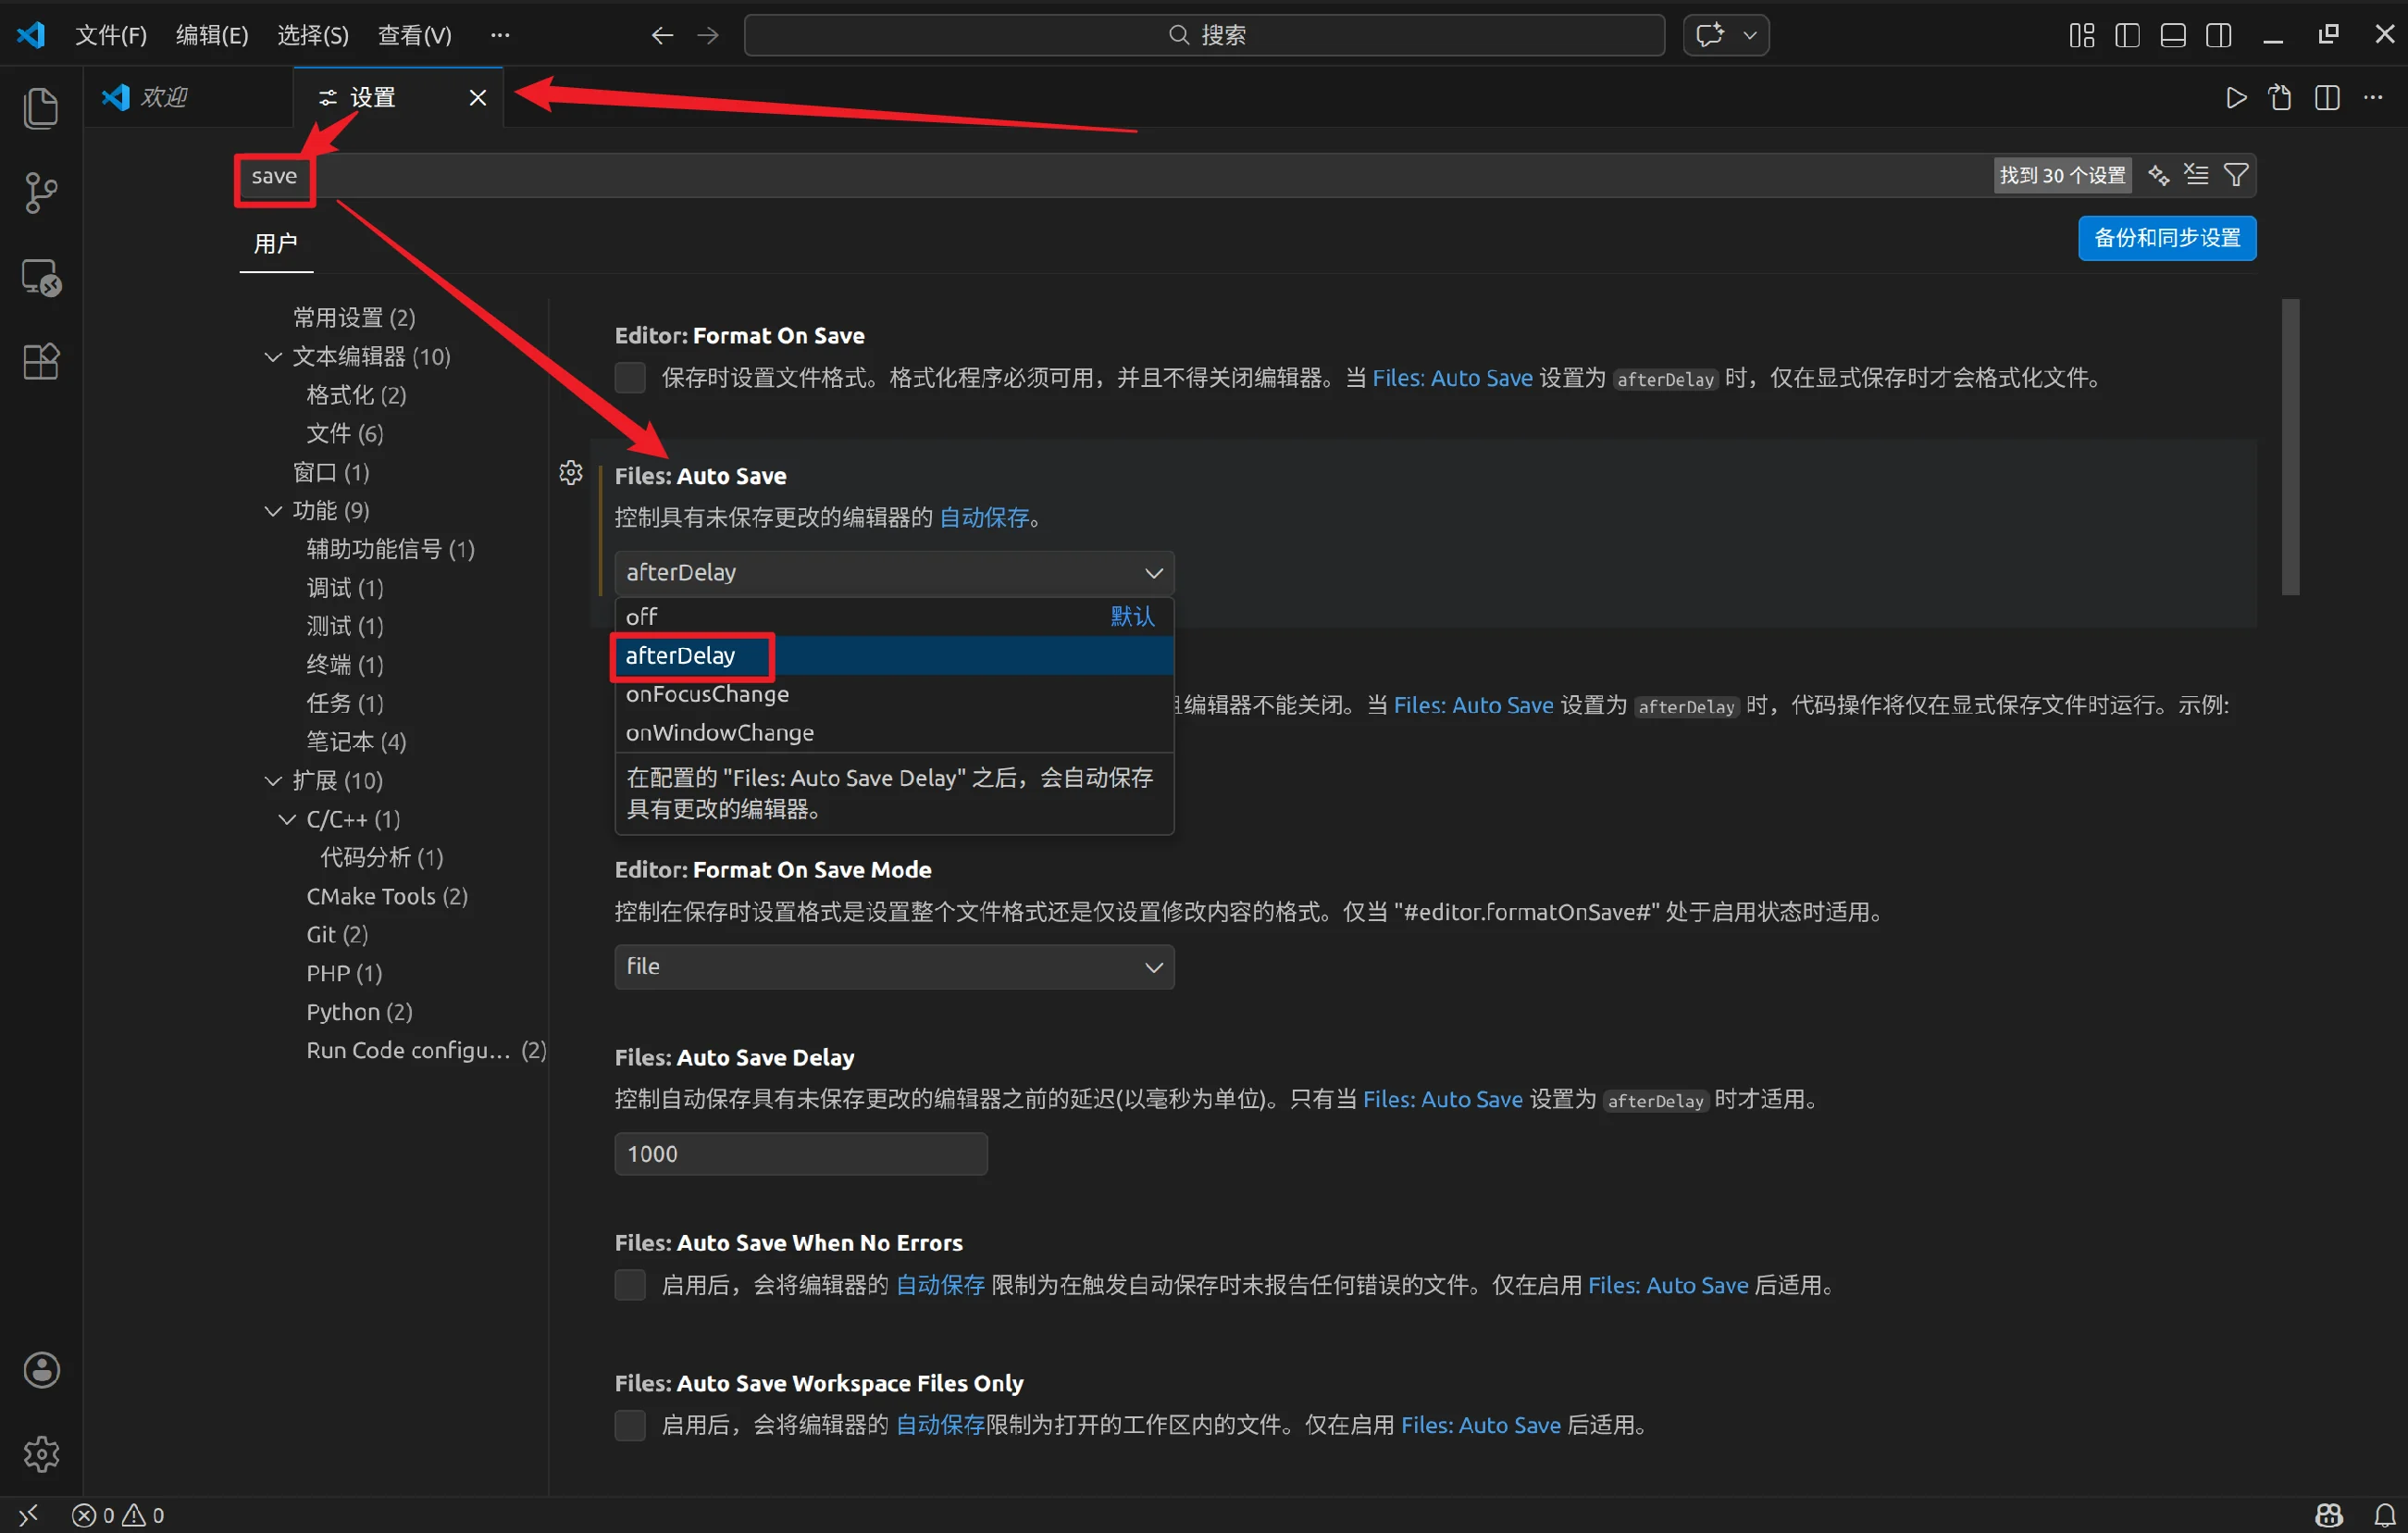
VScode 首先,
导 航 :
创建环境:
创建并进入文件夹
1 mkdir -p CHAPT6/chapt6_ws/src && cd CHAPT6/chapt6_ws/src
创建ros2环境
1 ros2 pkg create fishbot_description --build-type ament_cmake --license Apache-2.0
对照表:
1
2
ros2 pkg create fishbot_description --build-type ament_cmake --license Apache-2.0 ros2 功能包操作 创建 fishbot_description -- 构建类型 ROS 2 中基于 CMake 的标准构建方式 -- 开源许可证 Apache 2.0 协议
示例反馈:
1
2
3
4
5
6
7
8
9
10
11
12
13
14
15
16
going to create a new package package name: fishbot_description destination directory: /home/noi/fishros/CHAPT6/chapt6_ws/src package format: 3 version: 0.0.0 description: TODO: Package description maintainer: ['noi <example@example.com>' ] licenses: ['Apache-2.0' ] build type : ament_cmake dependencies: [] creating folder ./fishbot_description creating ./fishbot_description/package.xml creating source and include folder creating folder ./fishbot_description/src creating folder ./fishbot_description/include/fishbot_description creating ./fishbot_description/CMakeLists.txt
1
2
3
4
5
6
7
8
9
10
11
12
13
14
. └── CHAPT6 └── chapt6_ws └── src └── fishbot_description ├── CMakeLists.txt ├── include │ └── fishbot_description ├── LICENSE ├── package.xml ├── urdf └── src 7 directories, 3 files
机器人模型文件储存 —— urdf文件夹
1
2
cd fishbot_description && mkdir urdf cd urdf && touch first_robot.urdf
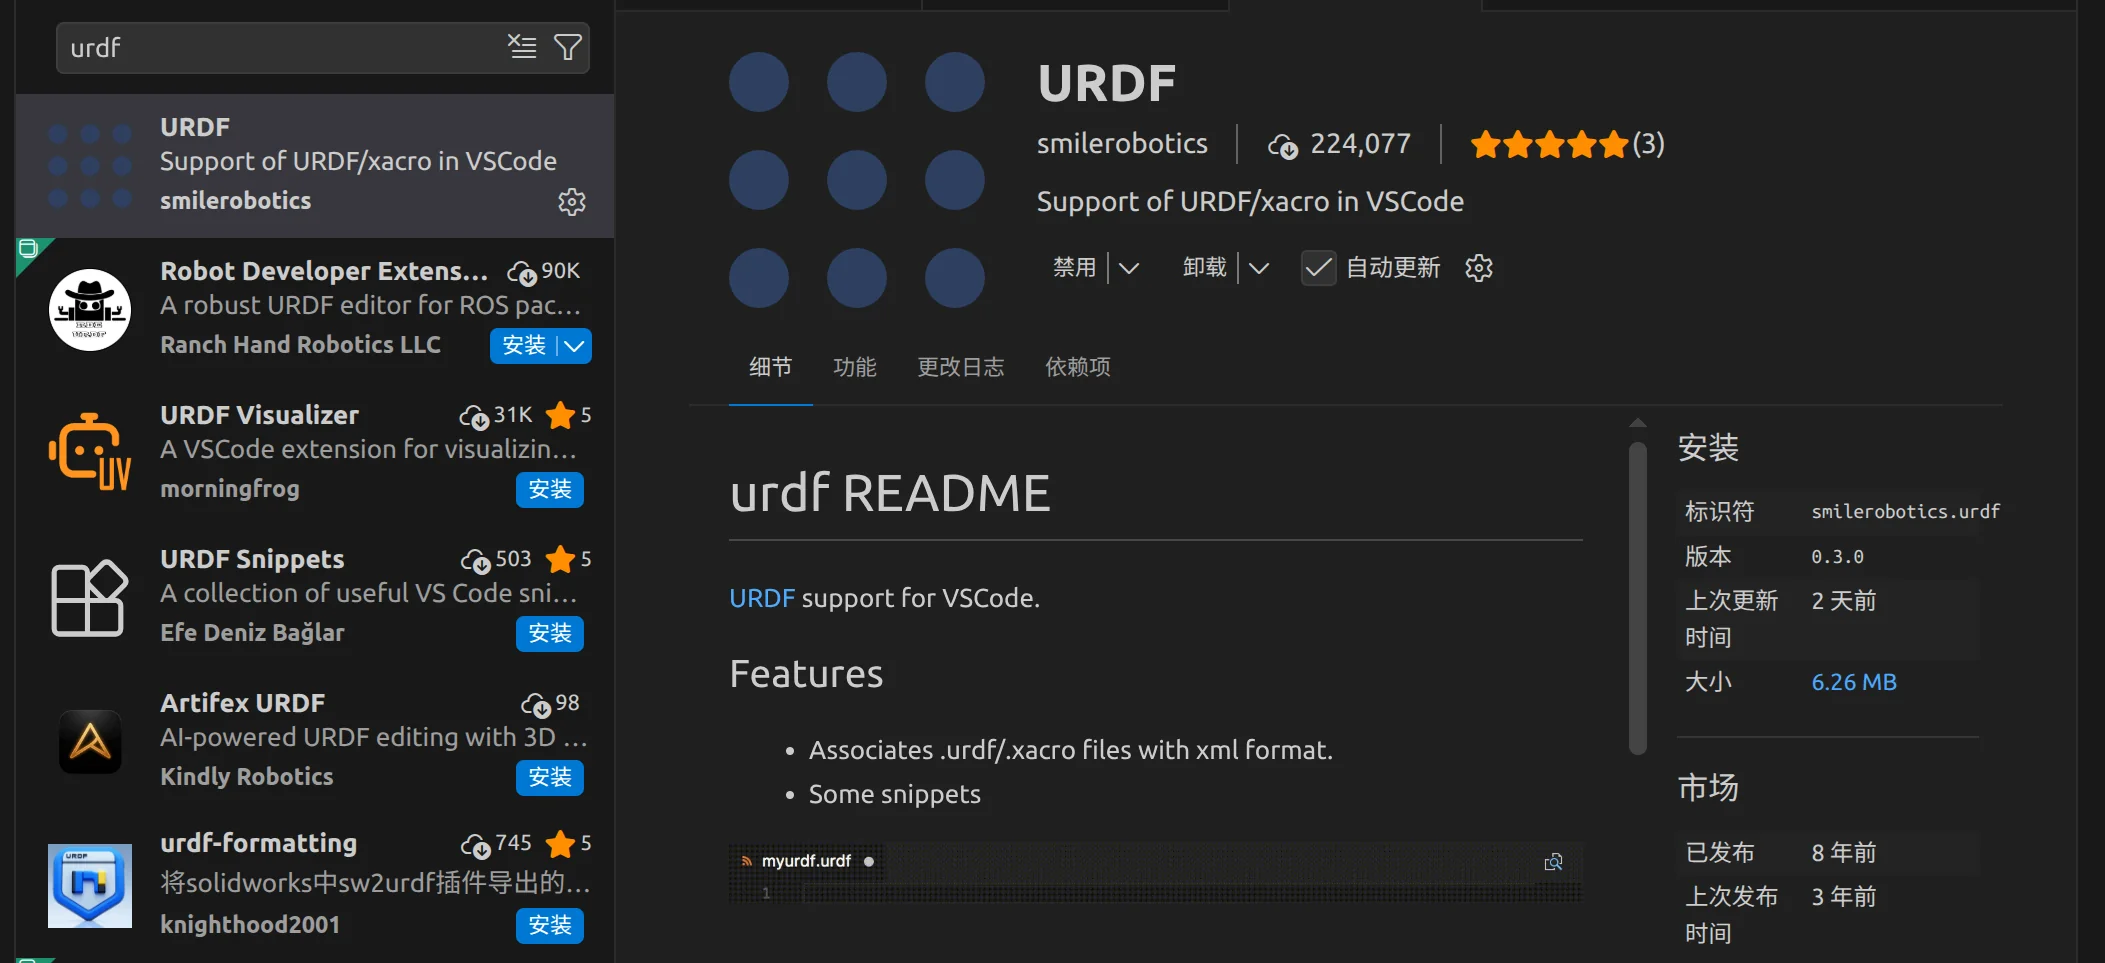
另外需要手动在vscode中安装 urdf 插件
编辑first_robot.urdf
first_robot.urdf的内容
1
2
3
4
5
6
7
8
9
10
11
12
13
14
15
16
17
18
19
20
21
22
23
24
25
26
27
28
29
30
31
32
33
34
35
36
37
38
39
40
41
42
43
44
45
46
47
48
49
<?xml version="1.0" ?> <robot name ="first" > <link name ="base_link" > <visual > <origin xyz ="0.0 0.0 0.0" rpy ="0.0 0.0 0.0" /> <geometry > <cylinder radius ="0.10" length ="0.12" /> </geometry > <material name ="white" > #requester: making request: turtlesim.srv.Spawn_Request(x=1.0, y=2.0, theta=0.0, name='') # #response: #turtlesim.srv.Spawn_Response(name='turtle2') <color rgba ="1.0 1.0 1.0 0.5" /> </material > </visual > </link > <link name ="imu_link" > <visual > <origin xyz ="0.0 0.0 0.0" rpy ="0.0 0.0 0.0" /> <geometry > <box size ="0.02 0.02 0.02" /> </geometry > <material name ="black" > <color rgba ="0.0 0.0 0.0 0.5" /> </material > </visual > </link > <joint name ="imu_joint" type ="fixed" > <origin xyz ="0.0 0.0 0.03" rpy ="0.0 0.0 0.0" /> <parent link ="base_link" /> <child link ="imu_link" /> </joint > </robot >
打开集成终端 输入
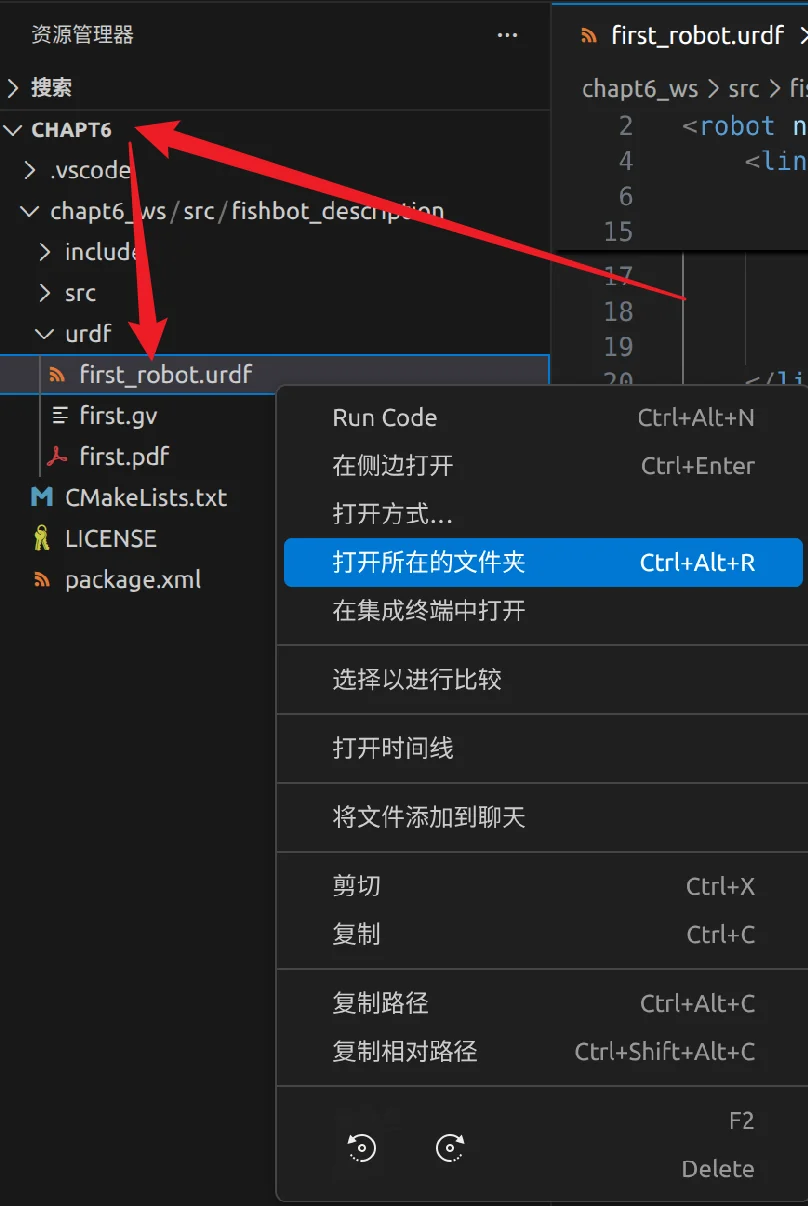
1 2 urdf_to_graphviz first_robot.urdf
如果报错 1 2 3 4 WARNING: OUTPUT not given. This type of usage is deprecated!Usage: urdf_to_graphviz input.xml [OUTPUT] Will create either $ROBOT_NAME .gv & $ROBOT_NAME .pdf in CWD or OUTPUT.gv & OUTPUT.pdf. Error: No link elements found in urdf file at line 206 in ./urdf_parser/src/model.cpp ERROR: Model Parsing the xml failed
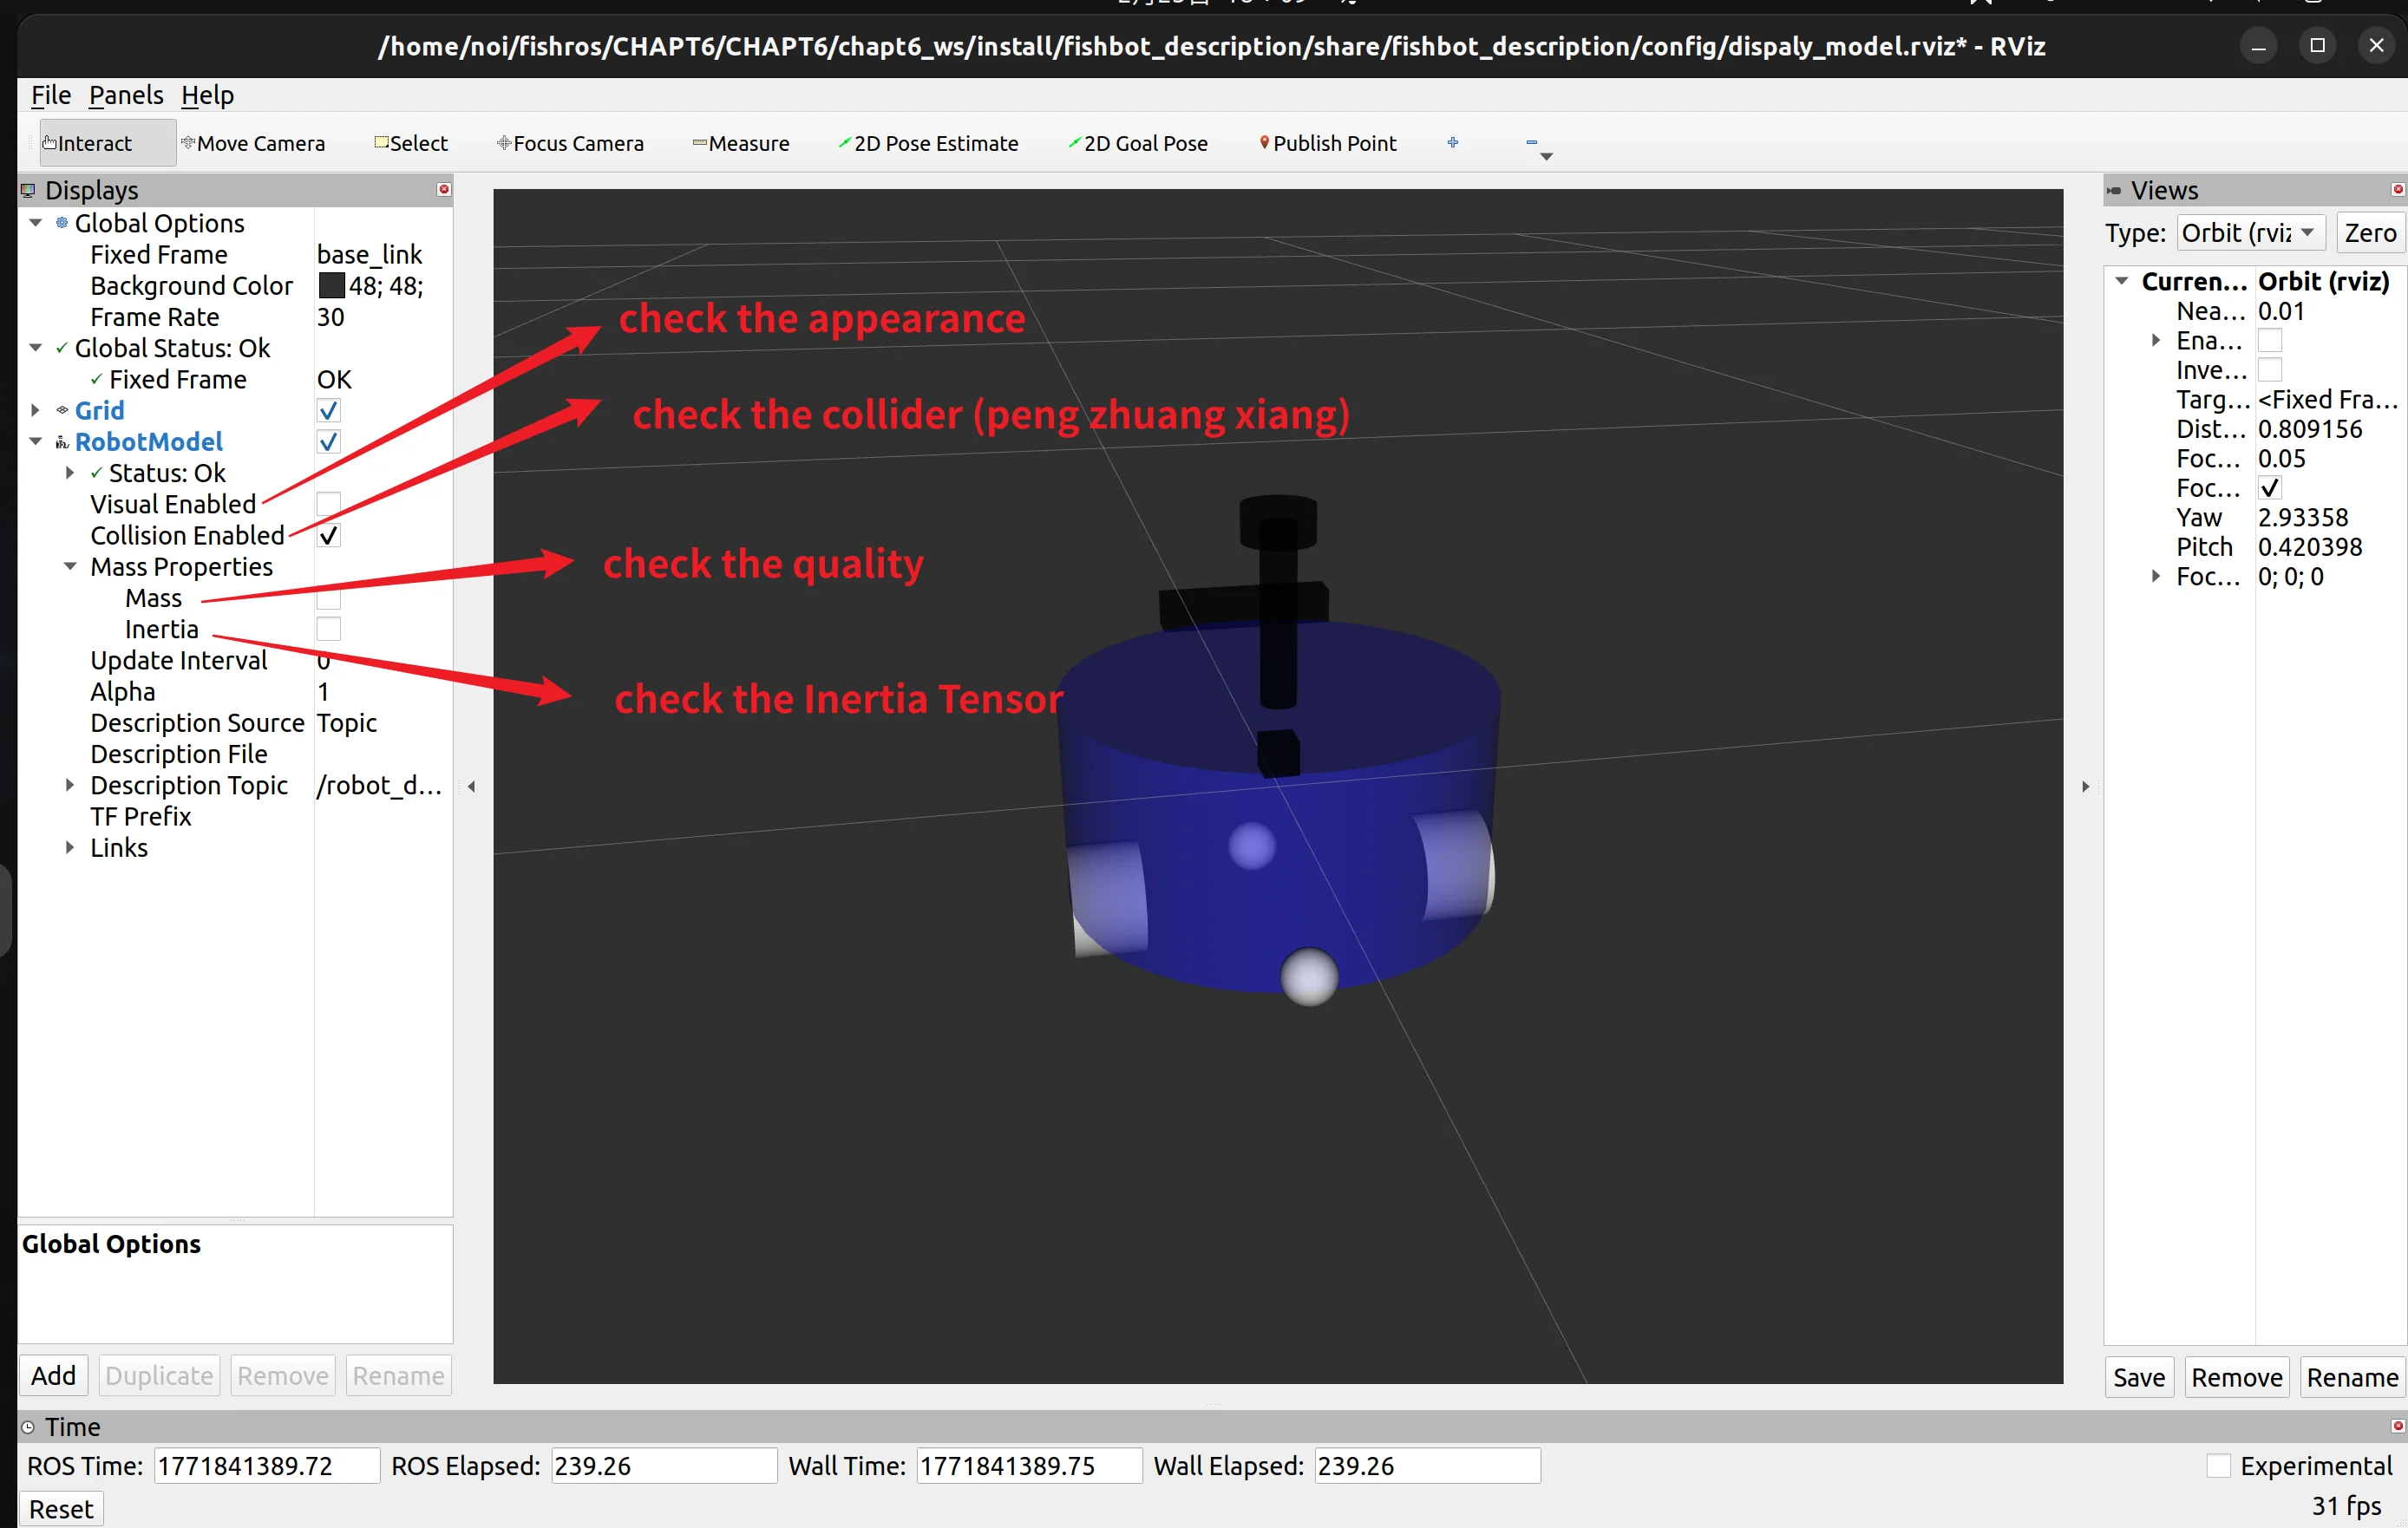
在RViz中查看模型
在集成终端中输入
rviz2
如果报错(简易方法) 如果rviz2发生渲染问题:如屏闪 Step1:更新显卡驱动(ai) Step2: 复制到命令行
1 2 3 4 5 6 7 8 9 10 11 12 13 14 15 16 17 18 cd tee -a ~/.bashrc <<'EOF' renv export LIBGL_ALWAYS_SOFTWARE=1 export QT_ENABLE_HIGHDPI_SCALING=0 export vblank_mode=0 export QT_XCB_GL_INTEGRATION=xcb_glx } EOF sources .bashrc
So, 使用ROS2内置的publisher实现自动的关系转换 1 2 sudo apt install ros-$ROS_DISTRO -joint-state-publishersudo apt install ros-$ROS_DISTRO -robot-state-publisher
编辑launch文件(方便运行/关闭多个节点)
1 2 3 cd ~/fishros/CHAPT6mkdir -p chapt6_ws/src/fishbot_description/launchtouch chapt6_ws/src/fishbot_description/launch/display_robot.launch.py
display_robot.launch.py的内容
1 2 3 4 5 6 7 8 9 10 11 12 13 import launchimport launch_rosdisplay_robot.launch.pyfrom ament_index_python.packages import get_package_share_directorydef generate_launch_description (): return launch.LaunchDescription([ ])
1 2 3 4 5 6 7 8 9 10 11 12 13 #CMakeList.txt #...... #endif() #自己定位一下吧 install(DIRECTORY launch urdf DESTINATION share/${PROJECT_NAME} ) #ament_package()
这里有点麻烦,建议直接看
鱼香ros视频 ,
文字解析附上
ROS 2 Launch 文件详解
ps:config文件怎么出来的
这是一个用于启动 fishbot_description 机器人描述相关节点的 ROS 2 Launch 文件。它会加载 URDF 模型、发布机器人状态,并启动 RViz2 进行可视化。
display_robot.launch.py完整代码与对应CMakeList.txt
1 2 3 4 5 6 7 8 9 10 11 12 #CMakeList.txt #...... #endif() #自己定位一下吧 install(DIRECTORY launch urdf config DESTINATION share/${PROJECT_NAME} ) #ament_package()
1 2 3 4 5 6 7 8 9 10 11 12 13 14 15 16 17 18 19 20 21 22 23 24 25 26 27 28 29 30 31 32 33 34 35 36 37 38 39 40 41 42 43 44 45 46 47 48 49 50 51 52 53 54 55 56 57 import launchimport launch_rosfrom ament_index_python.packages import get_package_share_directoryimport osdef generate_launch_description (): urdf_package_path = get_package_share_directory('fishbot_description' ) default_urdf_path = os.path.join(urdf_package_path, 'urdf' , 'first_robot.urdf' ) default_rviz_config_path = os.path.join(urdf_package_path, 'config' , 'display_robot_model.rviz' ) action_declear_arg_mode_path = launch.actions.DeclareLaunchArgument( name='model' , default_value=str (default_urdf_path), description='加载的模型文件路径' ) substitutions_command_result = launch.substitutions.Command( ['cat ' , launch.substitutions.LaunchConfiguration('model' )] ) robot_state_publisher_value = launch_ros.parameter_descriptions.ParameterValue( substitutions_command_result, value_type=str ) action_robot_state_publisher = launch_ros.actions.Node( package='robot_state_publisher' , executable='robot_state_publisher' , parameters=[{'robot_description' : robot_state_publisher_value}] ) action_joint_state_publisher = launch_ros.actions.Node( package='joint_state_publisher' , executable='joint_state_publisher' , ) action_rviz_node = launch_ros.actions.Node( package='rviz2' , executable='rviz2' , arguments=['-d' , default_rviz_config_path] ) return launch.LaunchDescription([ action_declear_arg_mode_path, action_robot_state_publisher, action_joint_state_publisher, action_rviz_node, ])
文件结构与导入
1 2 3 4 5 import launchimport launch_rosfrom ament_index_python.packages import get_package_share_directoryimport os
Shebang: #!/usr/bin/env python3 指定了运行此脚本的解释器。导入模块:
launch: ROS 2 Launch 系统的核心模块,提供基础功能。launch_ros: ROS 2 特定的 Launch 功能,例如启动 ROS 节点。get_package_share_directory: 用于获取指定包的共享目录路径(通常是 share/package_name)。os: Python 标准库,用于路径操作。
主函数 generate_launch_description
1 def generate_launch_description ():
这是 Launch 文件的入口函数。ROS 2 启动系统会调用此函数来获取需要执行的动作列表。
获取资源路径
1 2 3 urdf_package_path = get_package_share_directory('fishbot_description' ) default_urdf_path = os.path.join(urdf_package_path, 'urdf' , 'first_robot.urdf' ) default_rviz_config_path = os.path.join(urdf_package_path, 'config' , 'display_robot_model.rviz' )
get_package_share_directory('fishbot_description'): 获取 fishbot_description 包的安装路径。os.path.join(...): 安全地将目录和文件名拼接成完整路径。获取了默认的 URDF 文件路径和 RViz2 配置文件路径。
定义启动参数
1 2 3 4 5 action_declear_arg_mode_path = launch.actions.DeclareLaunchArgument( name='model' , default_value=str (default_urdf_path), description='加载的模型文件路径' )
launch.actions.DeclareLaunchArgument: 创建一个声明启动参数的动作。name='model': 参数名为 model。default_value=...: 如果启动时未提供 model 参数,则使用 default_urdf_path 作为默认值。description=...: 为此参数提供描述信息。这个参数允许用户在启动时动态指定不同的 URDF 文件,例如:ros2 launch <package> <launch_file> model:=/path/to/my_custom.urdf
处理 URDF 文件内容
1 2 3 4 5 6 7 substitutions_command_result = launch.substitutions.Command( ['cat ' , launch.substitutions.LaunchConfiguration('model' )] ) robot_state_publisher_value = launch_ros.parameter_descriptions.ParameterValue( substitutions_command_result, value_type=str )
launch.substitutions.LaunchConfiguration('model'): 获取 model 参数的实际值(可能是默认值,也可能是用户传入的值)。launch.substitutions.Command([...]): 执行一个系统命令(这里是 cat 命令)并将结果作为字符串返回。['cat ', ...] 拼接起来就是 cat /path/to/urdf/file.urdf,它会输出整个 URDF 文件的内容。launch_ros.parameter_descriptions.ParameterValue(...): 将命令执行的结果包装成一个可以在 ROS 2 节点参数中使用的对象。
启动 robot_state_publisher 节点
1 2 3 4 5 action_robot_state_publisher = launch_ros.actions.Node( package='robot_state_publisher' , executable='robot_state_publisher' , parameters=[{'robot_description' : robot_state_publisher_value}] )
launch_ros.actions.Node: 创建一个启动 ROS 节点的动作。package='robot_state_publisher': 指定节点所在的包。executable='robot_state_publisher': 指定要运行的可执行文件名称(通常与包同名)。parameters=[...]: 设置节点启动时的参数。
{'robot_description': ...}: 设置名为 robot_description 的参数,其值为之前通过 ParameterValue 包装的 URDF 内容。robot_state_publisher 节点会读取这个参数来获取机器人模型定义。
启动 joint_state_publisher 节点
1 2 3 4 action_joint_state_publisher = launch_ros.actions.Node( package='joint_state_publisher' , executable='joint_state_publisher' , )
这个节点通常用于发布机器人的关节状态(如位置、速度、力矩)。对于有活动关节的机器人,它是必需的。如果没有活动关节,有时可以用 joint_state_publisher_gui 或者不启动它(如果其他节点会发布关节状态)。
启动 rviz2 节点
1 2 3 4 5 action_rviz_node = launch_ros.actions.Node( package='rviz2' , executable='rviz2' , arguments=['-d' , default_rviz_config_path] )
arguments=['-d', ...]: 向 rviz2 可执行文件传递启动参数。-d 是 RViz2 的一个命令行选项,用于指定加载的配置文件。这里传入了预先获取的 default_rviz_config_path,这样 RViz2 会自动加载预设的显示配置。
返回启动描述
1 2 3 4 5 6 return launch.LaunchDescription([ action_declear_arg_mode_path, action_robot_state_publisher, action_joint_state_publisher, action_rviz_node, ])
launch.LaunchDescription([...]): 将所有需要执行的动作(action_...)放入一个列表中,并创建一个 LaunchDescription 对象返回。ROS 2 Launch 系统会依次执行这个列表中的所有动作,从而启动所有定义的节点和参数。
运行命令: 1 ros2 launch fishbot_description display_robot.launch.py
使用Xacro简化URDF
先创建一个xacro文件 1 2 cd /path/to/your/chapt6_ws touch src/fishbot_description/urdf/first_robot.xacro
格式对照 1 2 3 4 5 6 7 8 9 10 11 12 13 14 15 16 17 18 19 20 21 22 <robot xmlns:xacro ="http://www.ros.org/wiki/xacro" name ="first_robot" > <xacro:macro name ="base_link" params ="length radius" > <link name ="base_link" > <visual > <origin xyz ="0.0 0.0 0.0" rpy ="0.0 0.0 0.0" /> <geometry > <cylinder radius ="${radius}" length ="${length}" /> </geometry > <material name ="white" > <color rgba ="1.0 1.0 1.0 0.5" /> </material > </visual > </link > </xacro:macro >
1 2 3 4 5 6 7 8 9 10 11 12 13 14 15 16 17 18 19 20 <?xml version="1.0" ?> <robot name ="first_robot" > <link name ="base_link" > <visual > <origin xyz ="0.0 0.0 0.0" rpy ="0.0 0.0 0.0" /> <geometry > <cylinder radius ="0.10" length ="0.12" /> </geometry > <material name ="white" > <color rgba ="1.0 1.0 1.0 0.5" /> </material > </visual > </link >
Xacro语法
1. 添加 Wiki 指向
在 robot 标签中声明 xmlns:xacro 属性,指向 ROS Wiki。
<robot xmlns:xacro="http://www.ros.org/wiki/xacro" name="first_robot">
2. 定义宏(模块)
使用 <xacro:macro> 标签定义一个可重用的模块,并声明所需的参数(变量)。
<xacro:macro name="模块名" params="变量名1 变量名2">
3. 使用变量
在宏定义内部,通过 ${变量名} 的语法来引用和使用参数。
<cylinder radius="${变量名1}" length="${变量名2}"/>
4. 闭合宏定义
使用 </xacro:macro> 标签来正确闭合宏定义,确保其内部所有 XML 标签均已闭合。
</xacro:macro>
5. 调用宏
在 robot 文件结束前,使用 <xacro:宏名 参数1="值" 参数2="值" /> 的语法来实例化宏。
<xacro:模块名 变量名1="赋值" 变量名2="赋值"/>
完整文件,可以自行对比
first_robot.xacro
1 2 3 4 5 6 7 8 9 10 11 12 13 14 15 16 17 18 19 20 21 22 23 24 25 26 27 28 29 30 31 32 33 34 35 36 37 38 39 40 41 42 43 44 45 46 47 48 49 50 51 52 53 54 55 56 57 58 <?xml version="1.0" ?> <robot xmlns:xacro ="http://www.ros.org/wiki/xacro" name ="first_robot" > <xacro:macro name ="base_link" params ="length radius" > <link name ="base_link" > <visual > <origin xyz ="0.0 0.0 0.0" rpy ="0.0 0.0 0.0" /> <geometry > <cylinder radius ="${radius}" length ="${length}" /> </geometry > <material name ="white" > <color rgba ="1.0 1.0 1.0 0.5" /> </material > </visual > </link > </xacro:macro > <xacro:macro name ="imu_link" params ="imu_name xyz" > <link name ="${imu_name}_link" > <visual > <origin xyz ="0.0 0.0 0.0" rpy ="0.0 0.0 0.0" /> <geometry > <box size ="0.02 0.02 0.02" /> </geometry > <material name ="black" > <color rgba ="0.0 0.0 0.0 0.5" /> </material > </visual > </link > <joint name ="${imu_name}_joint" type ="fixed" > <origin xyz ="${xyz}" rpy ="0.0 0.0 0.0" /> <parent link ="base_link" /> <child link ="${imu_name}_link" /> </joint > </xacro:macro > <xacro:base_link length ="0.12" radius ="0.1" /> <xacro:imu_link imu_name ="imu_up" xyz ="0.0 0.0 0.03" /> <xacro:imu_link imu_name ="imu_down" xyz ="0.0 0.0 -0.03" /> </robot >
first_robot.urdf
1 2 3 4 5 6 7 8 9 10 11 12 13 14 15 16 17 18 19 20 21 22 23 24 25 26 27 28 29 30 31 32 33 34 35 36 37 38 39 40 41 42 43 44 45 46 <?xml version="1.0" ?> <robot name ="first_robot" > <link name ="base_link" > <visual > <origin xyz ="0.0 0.0 0.0" rpy ="0.0 0.0 0.0" /> <geometry > <cylinder radius ="0.10" length ="0.12" /> </geometry > <material name ="white" > <color rgba ="1.0 1.0 1.0 0.5" /> </material > </visual > </link > <link name ="imu_link" > <visual > <origin xyz ="0.0 0.0 0.0" rpy ="0.0 0.0 0.0" /> <geometry > <box size ="0.02 0.02 0.02" /> </geometry > <material name ="black" > <color rgba ="0.0 0.0 0.0 0.5" /> </material > </visual > </link > <joint name ="imu_joint" type ="fixed" > <origin xyz ="0.0 0.0 0.03" rpy ="0.0 0.0 0.0" /> <parent link ="base_link" /> <child link ="imu_link" /> </joint > </robot >
Xacro转为URDF
下载转换器: 1 sudo apt install ros-$ROS_DISTRO -xacro
运行转换器: 1 xacro /path/to/your/xacrofile
报错eg:(点击打开查看)
1 2 3 4 5 6 XML parsing error: mismatched tag: line 52, column 2 when processing file: /home/noi/fishros/CHAPT6/chapt6_ws/src/fishbot_description/urdf/first_robot.xacro Check that: - Your XML is well-formed - You have the xacro xmlns declaration: xmlns:xacro="http://www.ros.org/wiki/xacro"
这个时候可以将原本的display_robot.launch.py中导入urdf文件的命令改为 1 2 3 4 5 6 7 8 9 10 11 12 substitutions_command_result = launch.substitutions.Command( ['xacro ' , launch.substitutions.LaunchConfiguration('model' )] ) robot_state_publisher_value = launch_ros.parameter_descriptions.ParameterValue( substitutions_command_result, value_type=str )
运行测试
1 2 3 4 cd /path/to/your/chapt6_ws colcon build source install/setup.bashros2 launch fishbot_description display_robot.launch.py model:=/path/to/your/chapt6_ws/install/fishbot_description/share/fishbot_description/urdf/first_robot.xacro
Xacro标签的好处: - 1、使用与声明分开,看起来简洁 - 2、可以批量生成类似的元素 - 3、降低维护成本
Xacro使用示例
在chapt6_ws中依次运行:
1 2 3 4 5 colcon build source install/setup.bashros2 launch fishbot_description display_robot.launch.py model:=/path/to/your/fishros/CHAPT6/chapt6_ws/src/fishbot_description/urdf/fishbot/fishbot.urdf.xacro
Rviz2中查看,从File切换为Topic
为机器人添加物理属性
添加碰撞箱
1 2 3 4 5 6 7 8 9 10 11 12 13 14 15 16 17 18 19 20 21 22 23 <?xml version="1.0" ?> <robot xmlns:xacro ="http://www.ros.org/wiki/xacro" > <xacro:macro name ="base_xacro" params ="length radius" > <link name ="base_link" > <visual > ... </visual > <collision > <origin xyz ="0 0 0.0" rpy ="0 0 0" /> <geometry > <cylinder length ="${length}" radius ="${length}" /> </geometry > <material name ="white" > <color rgba ="1.0 1.0 1.0 0.5" /> </material > </collision > </link > </xacro:macro > </robot >
想省事就直接复制visual标签内容就行,把所有部件都改一下 改完可以在rviz2中查看
添加惯性
原理——惯性张量 (Inertia Tensor)
1. 一般形式 (3x3 矩阵)
2. 球体 (Sphere) 的惯性张量
$$ I = \begin{bmatrix}
\frac{2}{5}mr^2 & 0 & 0 \\
0 & \frac{2}{5}mr^2 & 0 \\
0 & 0 & \frac{2}{5}mr^2
\end{bmatrix} $$
3. 长方体 (Box) 的惯性张量
$$ I = \begin{bmatrix}
\frac{1}{12}m(h^2 + d^2) & 0 & 0 \\
0 & \frac{1}{12}m(w^2 + d^2) & 0 \\
0 & 0 & \frac{1}{12}m(w^2 + h^2)
\end{bmatrix} $$
4. 圆柱体 (Cylinder) 的惯性张量
$$ I = \begin{bmatrix}
\frac{1}{12}m(3r^2 + h^2) & 0 & 0 \\
0 & \frac{1}{12}m(3r^2 + h^2) & 0 \\
0 & 0 & \frac{1}{2}mr^2
\end{bmatrix} $$
说明:
类型: 这些是物理学中的数学公式 ,具体为惯性张量 (Inertia Tensor),用于描述刚体在三维空间中绕不同轴旋转时的惯性特性。I 是惯性张量矩阵。m 是质量。r 是半径。h 是高度/长度。w 是宽度。d 是深度。
所以,添加计算式到程序中:
1 2 cd /home/noi/fishros/CHAPT6/CHAPT6/chapt6_ws/src/fishbot_description/urdf/fishbot touch common_inertia.xacro
common_inertia.xacro直接拿来用
1 2 3 4 5 6 7 8 9 10 11 12 13 14 15 16 17 18 19 20 21 22 23 24 25 26 27 28 <?xml version="1.0" ?> <robot xmlns:xacro ="http://ros.org/wiki/xacro" > <xacro:macro name ="box_inertia" params ="m w h d" > <inertial > <mass value ="${m}" /> <inertia ixx ="${(m/12) * (h*h + d*d)}" ixy ="0.0" ixz ="0.0" iyy ="${(m/12) * (w*w + d*d)}" iyz ="0.0" izz ="${(m/12) * (w*w + h*h)}" /> </inertial > </xacro:macro > <xacro:macro name ="cylinder_inertia" params ="m r h" > <inertial > <mass value ="${m}" /> <inertia ixx ="${(m/12) * (3*r*r + h*h)}" ixy ="0" ixz ="0" iyy ="${(m/12) * (3*r*r + h*h)}" iyz ="0" izz ="${(m/2) * (r*r)}" /> </inertial > </xacro:macro > <xacro:macro name ="sphere_inertia" params ="m r" > <inertial > <mass value ="${m}" /> <inertia ixx ="${(2/5) * m * (r*r)}" ixy ="0.0" ixz ="0.0" iyy ="${(2/5) * m * (r*r)}" iyz ="0.0" izz ="${(2/5) * m * (r*r)}" /> </inertial > </xacro:macro > </robot >
引入common_inertia.xacro
1 2 3 4 5 6 7 8 9 10 11 12 13 14 15 16 17 18 <?xml version="1.0" ?> <robot xmlns:xacro ="http://www.ros.org/wiki/xacro" > <xacro:include filename ="$(find fishbot_description)/urdf/fishbot/common_inertia.xacro" /> <xacro:macro name ="base_xacro" params ="length radius" > ...... ...... </collision > <xacro:cylinder_inertia m ="1.0" r ="${radius}" h ="${length}" /> </link > </xacro:macro > </robot >
在Gazebo中完成仿真
安装与使用Gazebo构建世界
安装:
1 2 sudo apt install gazebo
下载模型:
1 2 3 4 mkdir -p ~/.gazebocd ~/.gazebogit clone https://gitee.com/ohhuo/gazebo_models.git ~/.gazebo/models rm -rf ~/.gazebo/models/.git
Author:
Lyxy-szs
Permalink:
http://lyxy-szs.github.io/2026/02/02/ros2-note/
Slogan:
永远相信美好的事情即将發生 ?
 输入
输入 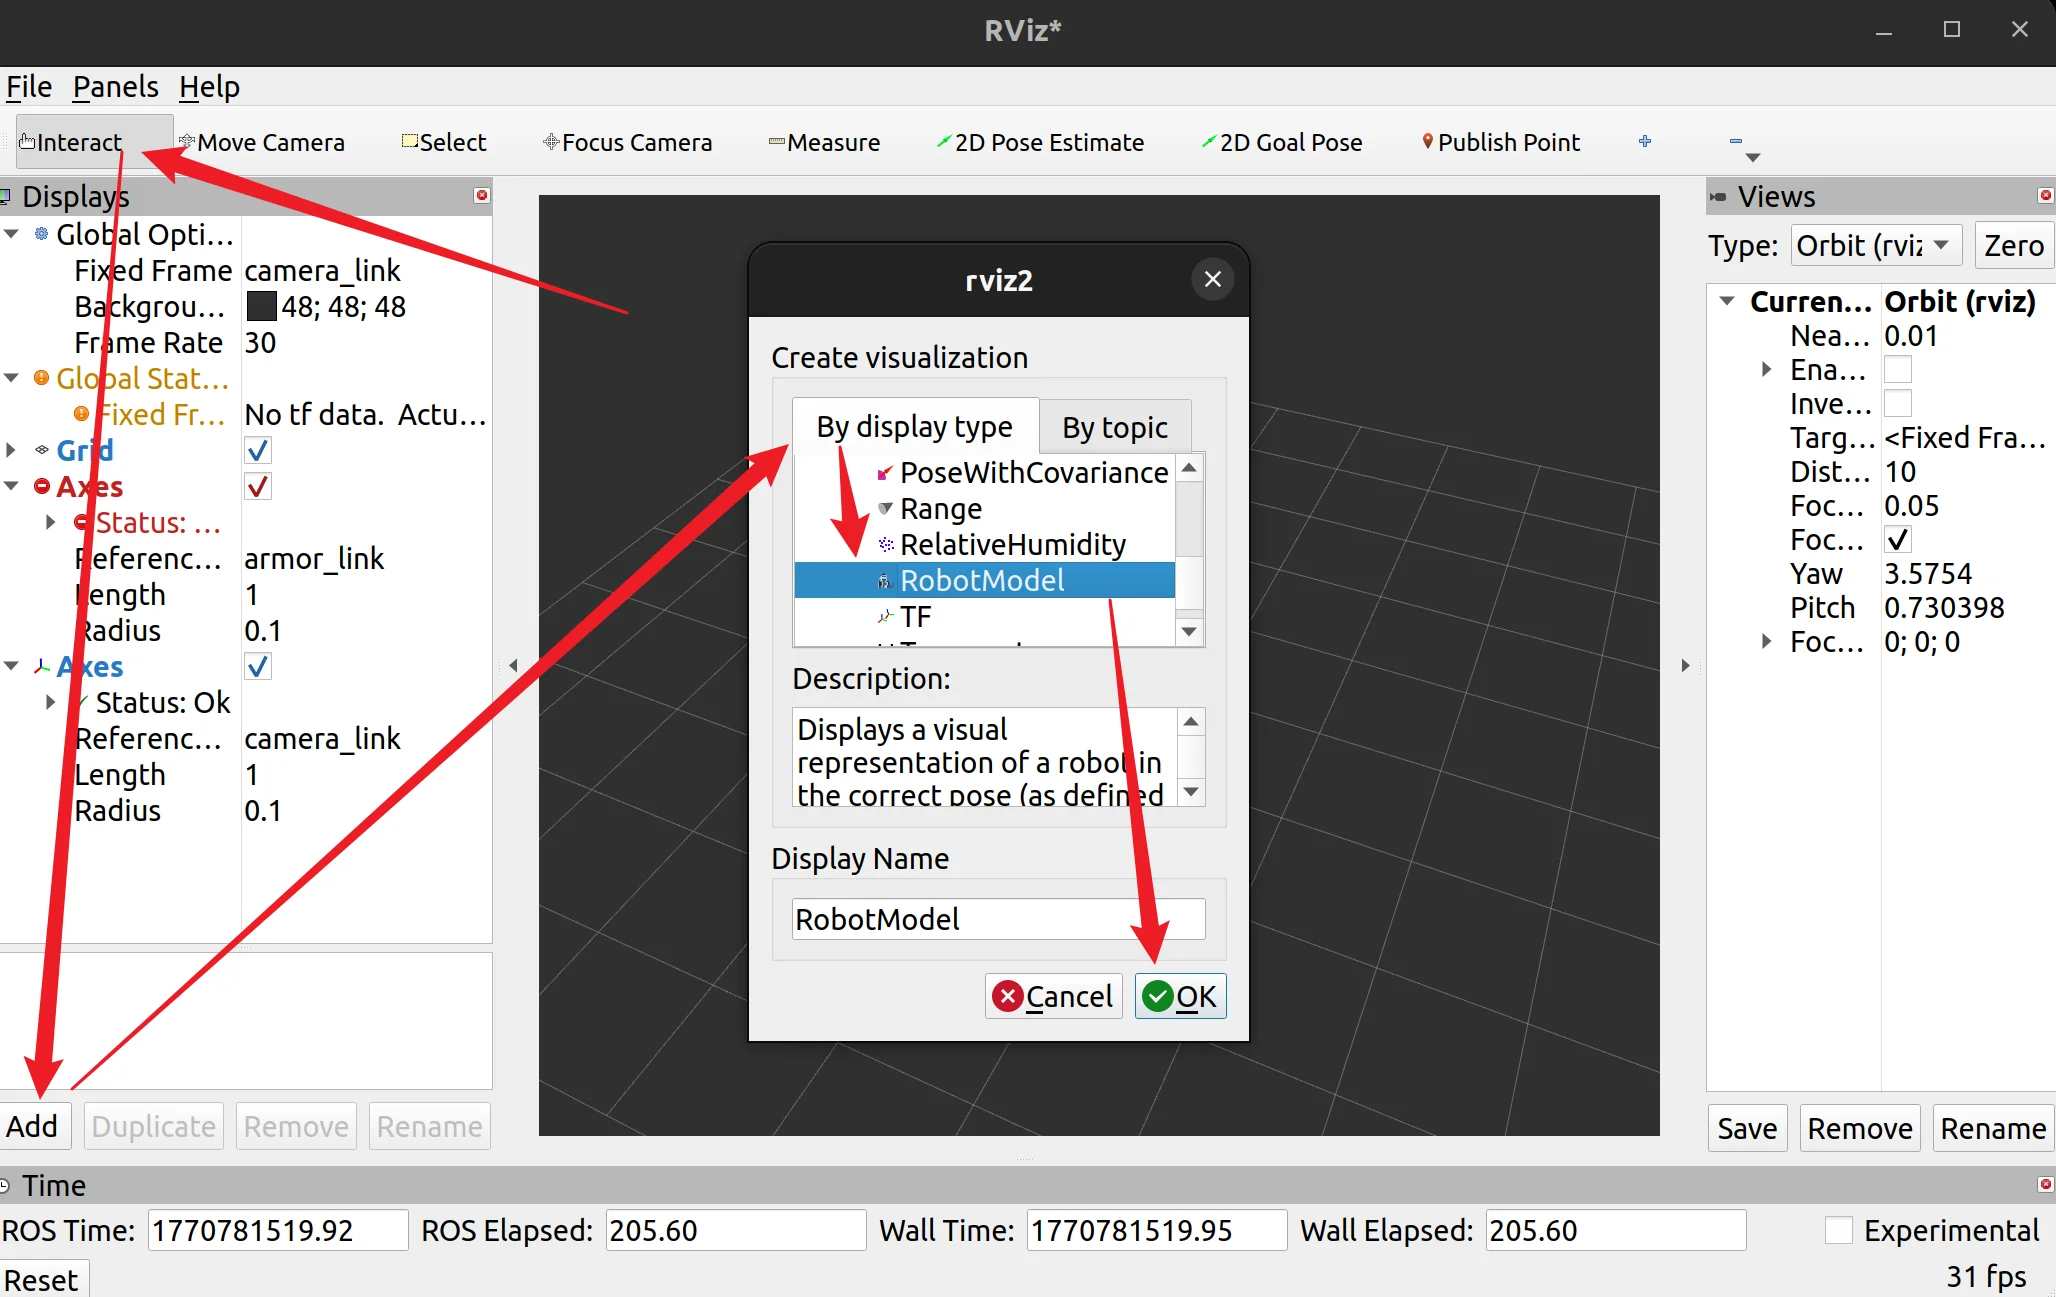 —————————-我是分割线—————————–
 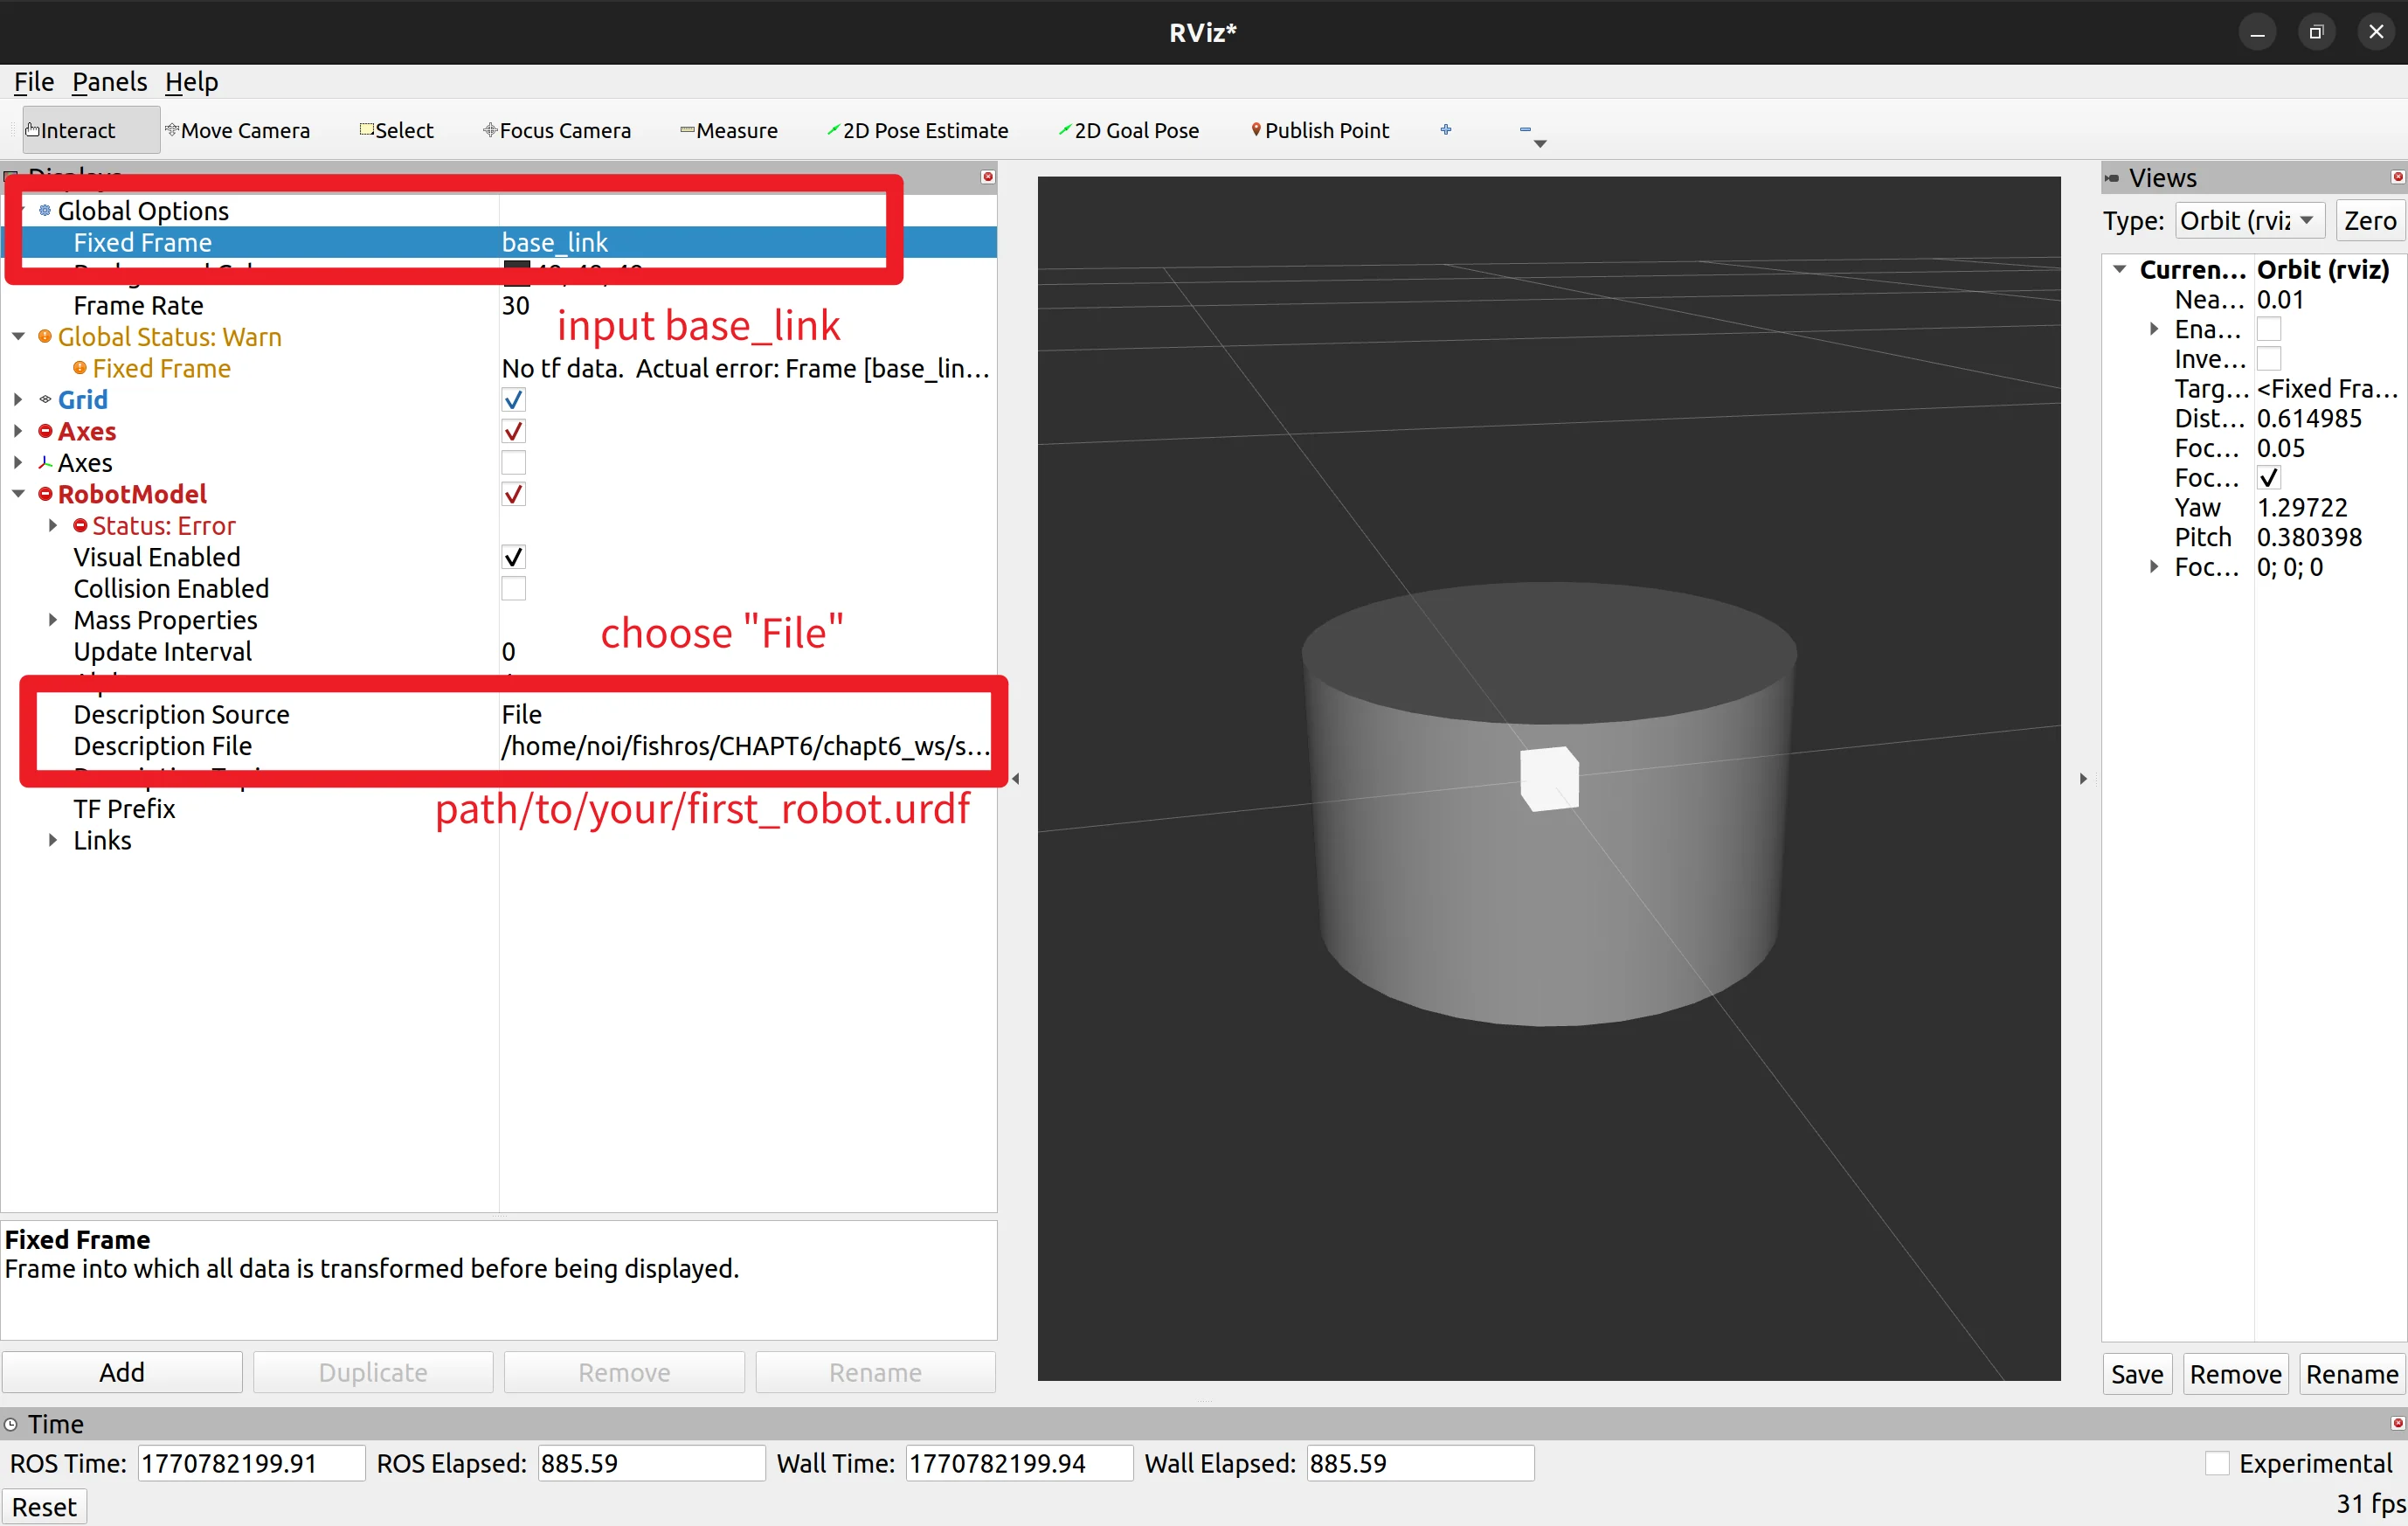 但是当前还是无法直接显示imu_link base_link之间的关系,原因是rviz2默认使用map,需要tf变换
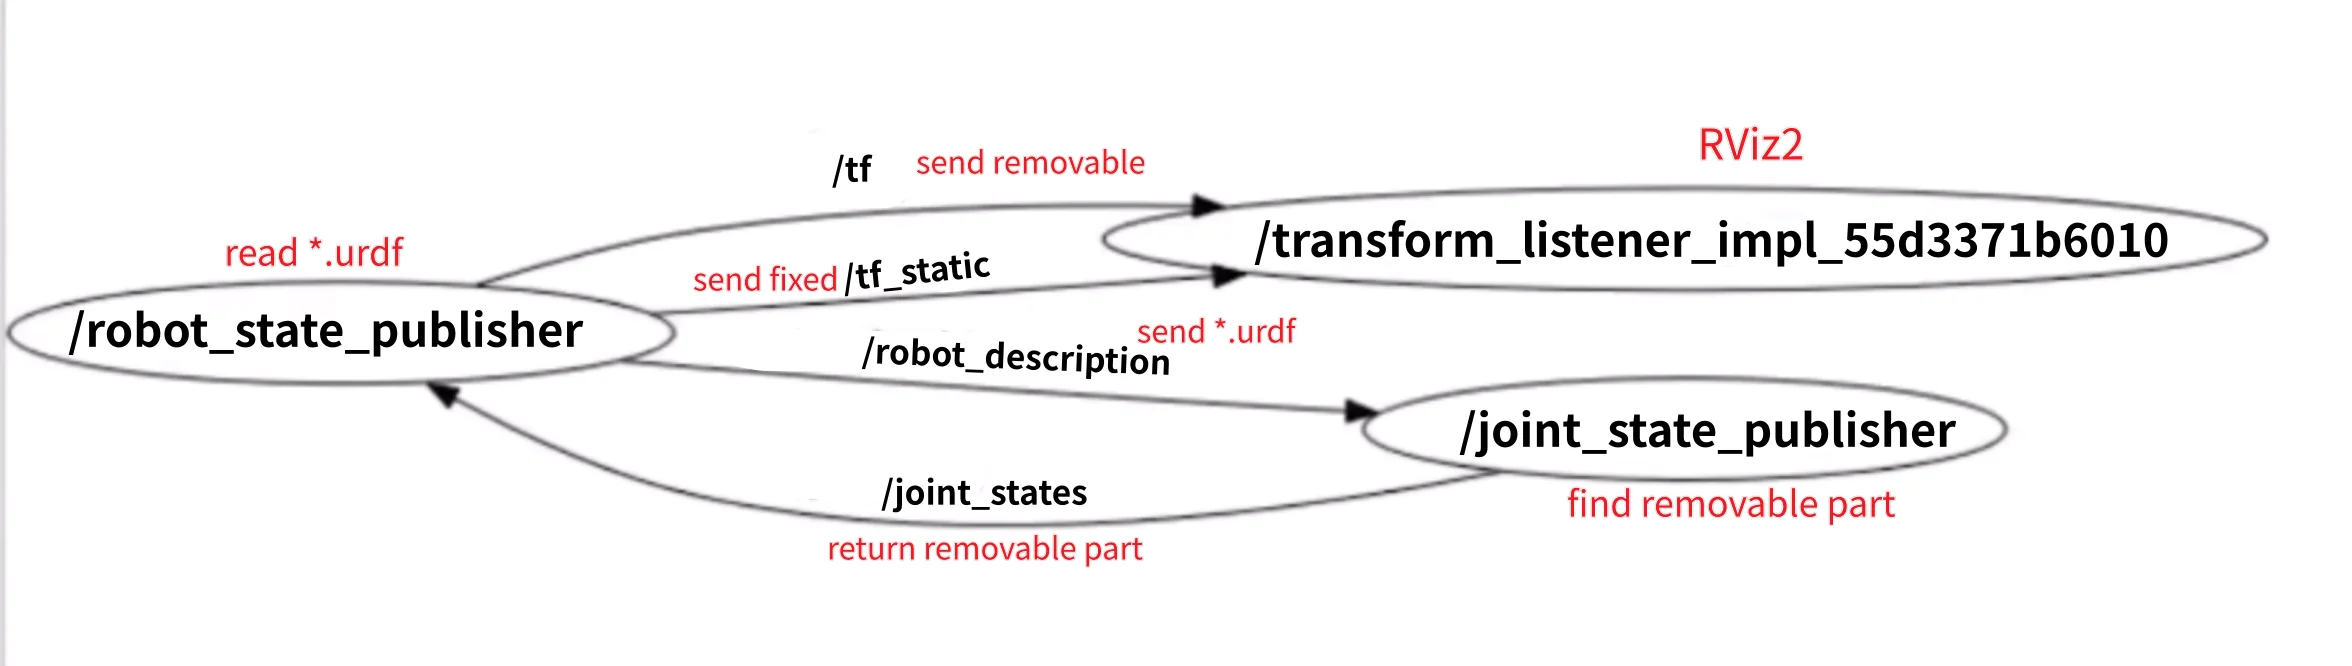 运行
运行